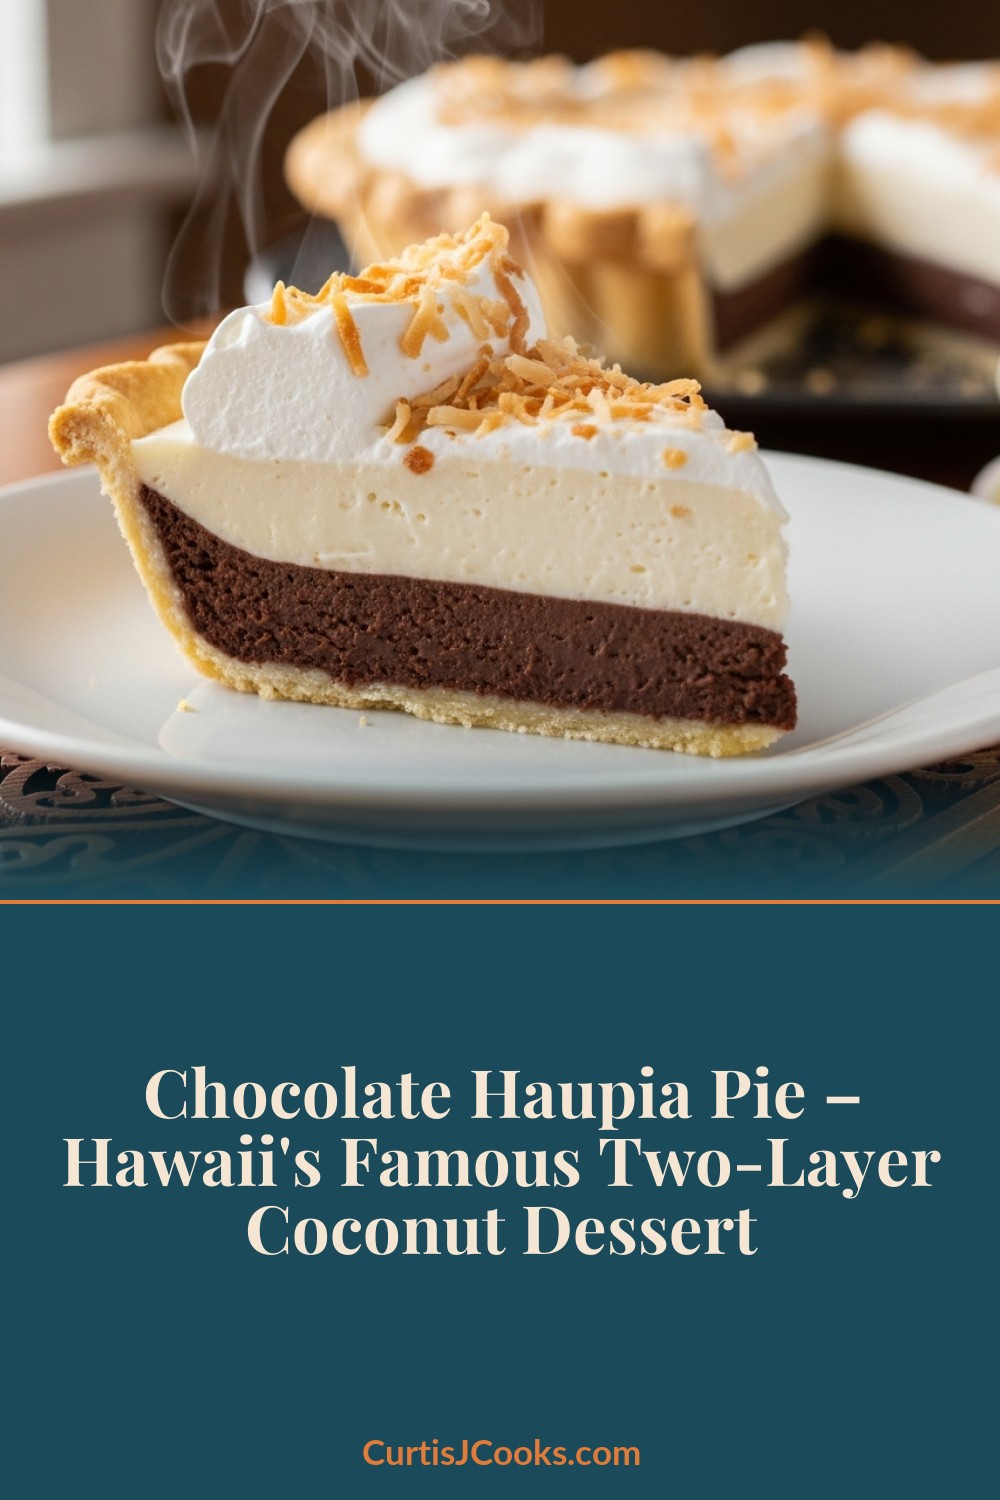
If you’ve ever visited Hawaii and stopped at a bakery — any bakery — chances are you’ve seen it in the display case: chocolate haupia pie. Two silky layers of pure paradise, one rich chocolate and one creamy coconut, sitting in a flaky pie crust and crowned with a cloud of whipped cream. This is the dessert that locals argue over, visitors dream about, and home bakers try (and often fail) to recreate. Until now.
I’m going to walk you through exactly how to make this iconic Hawaiian dessert at home, and trust me — once you nail it, your family will never let you show up to a gathering without one.
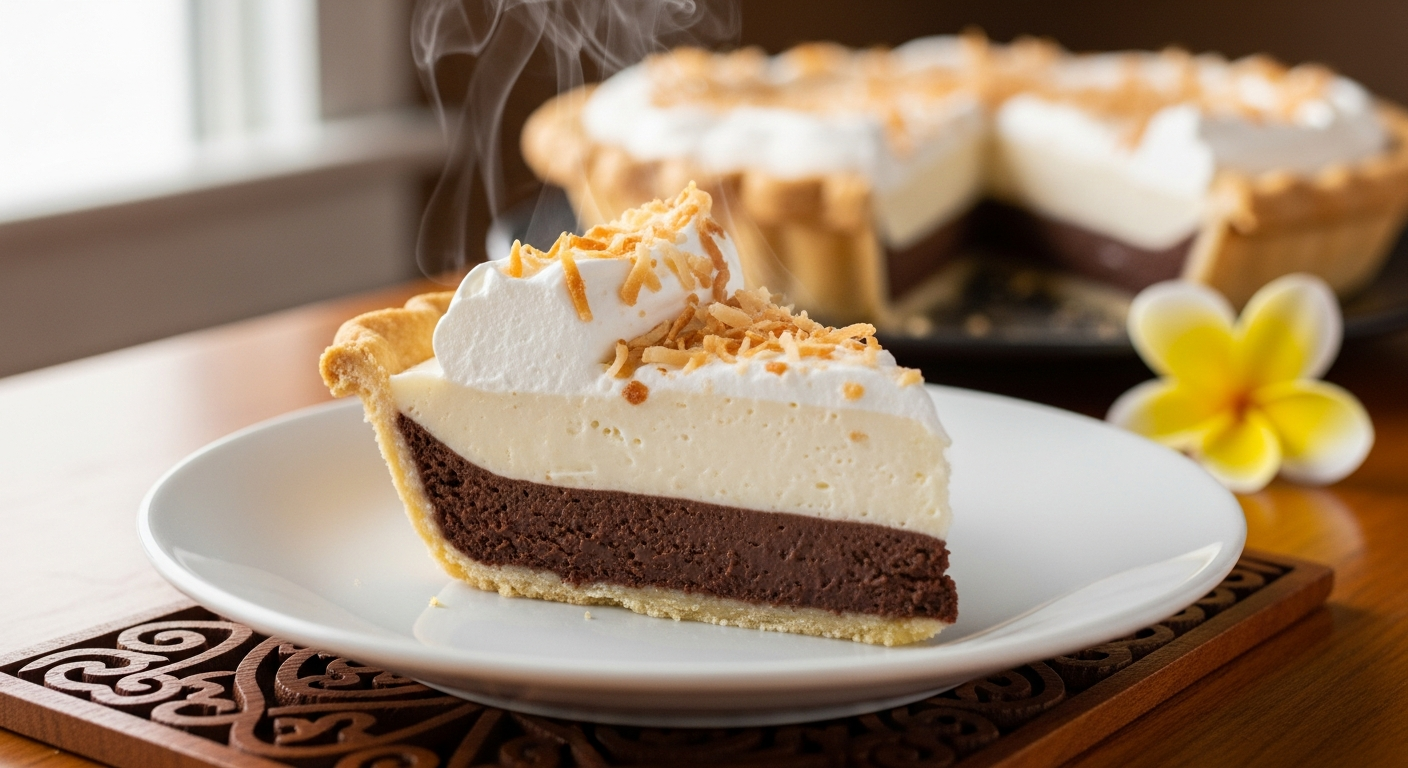
What Is Chocolate Haupia Pie?
At its heart, chocolate haupia pie is a two-layer chilled pie. The bottom layer is a rich, velvety chocolate pudding made with coconut milk and dark chocolate. The top layer is haupia — a traditional Hawaiian coconut pudding that’s been a staple at luaus and celebrations for generations. The whole thing sits in a pre-baked pie crust and gets finished with a generous layer of fresh whipped cream.
Free: Hawaiian Cooking Starter Kit
Get 5 essential island recipes + a printable pantry checklist — everything you need to start cooking Hawaiian at home.
No spam, ever. Unsubscribe anytime.
The magic is in the contrast. You get that deep, bittersweet chocolate hitting your taste buds first, followed immediately by the cool, mellow sweetness of coconut. Every bite is a little tug-of-war between two incredible flavors, and honestly, nobody loses.
How Ted’s Bakery Made It Famous
You can’t talk about chocolate haupia pie without mentioning Ted’s Bakery on Oahu’s North Shore. Located right near Sunset Beach, Ted’s has been serving up their version since the 1980s, and it single-handedly turned this pie into a must-have for anyone visiting Hawaii. Surfers would grab a slice after hitting the waves at Pipeline. Tourists would line up before the display case was even full.
But here’s the thing — Ted’s didn’t invent haupia, and they weren’t the first to combine chocolate and coconut. What they did was perfect the ratio and put it on the map. Today, practically every bakery in the islands has their own version. Zippy’s has one. Liliha Bakery has one. Your auntie probably has one too. It’s that universal.
The Haupia Connection
To really appreciate this pie, you need to understand haupia. Haupia is one of the most traditional Hawaiian desserts — a simple coconut pudding that was originally made with arrowroot starch and fresh coconut milk extracted by hand from grated coconut meat. It was served at every luau, cut into firm squares and eaten with your fingers.
Over the years, haupia evolved. Cornstarch replaced arrowroot. Canned coconut milk made it more accessible. And somewhere along the way, someone had the brilliant idea to layer it on top of chocolate pudding and put it all in a pie crust. That’s the beauty of Hawaiian food — deep respect for tradition with zero fear of innovation.
What Makes This Pie So Special
I’ve made a lot of desserts, and chocolate haupia pie remains one of the most satisfying to serve. Here’s why:
The texture. Both layers are silky-smooth — almost like a cross between pudding and custard. They hold their shape when you slice the pie but melt on your tongue immediately. When you add the whipped cream on top, you’ve got three distinct textures working together.
The flavor balance. The chocolate layer is rich but not overwhelming because the coconut milk tempers it. The haupia layer is sweet but not cloying. Together, they’re perfectly balanced — neither one dominates.
The presentation. When you slice into this pie and see those clean, distinct layers — dark chocolate on the bottom, white coconut on top, whipped cream above — it looks like something from a professional bakery. People will think you spent hours on it.
Tips for the Perfect Chocolate Haupia Pie
After making this pie more times than I can count, here are the lessons that matter most:
Use Full-Fat Coconut Milk
This is non-negotiable. Full-fat coconut milk is what gives both layers their rich, creamy body. Light coconut milk will leave you with thin, watery layers that won’t set properly. Shake the can well before opening so the cream and liquid are fully combined.
Cornstarch Is Your Best Friend
Cornstarch is the key thickener for both layers. The technique is simple: whisk it with the cold liquids first before you turn on the heat. This prevents lumps. Once the mixture hits the stovetop, stir constantly. You’ll feel it suddenly thicken — that’s the cornstarch activating. Keep stirring for another minute after that to cook out the starchy taste.
Let It Set Properly
I know it’s tempting to cut into the pie after a couple of hours, but patience is everything. Give it a full 4 hours in the fridge, or better yet, make it the night before and let it set overnight. The layers need time to firm up so they hold their shape when you slice.
Crust Options
A store-bought pie crust works perfectly fine here — just make sure it’s pre-baked according to the package directions. If you want to go the extra mile, a homemade butter crust adds a wonderful flaky richness. Some folks use a graham cracker crust, which also works beautifully with the chocolate-coconut combo. There’s no wrong answer.
How to Serve Chocolate Haupia Pie
Always serve this pie cold, straight from the fridge. Use a sharp knife dipped in hot water and wiped clean between each slice — this gives you those gorgeous clean layers. Garnish with a sprinkle of toasted coconut flakes or chocolate shavings if you’re feeling fancy.
This pie is perfect for potlucks, Hawaiian Thanksgiving Menu”>holidays, birthday parties, or honestly just a random Tuesday when you need something beautiful in your life. Make it once, and I guarantee it’ll become your go-to dessert for every occasion.
Recipe: Chocolate Haupia Pie
Scroll down to the recipe card below for the full list of ingredients, step-by-step instructions, and nutrition information. And if you try this recipe, I’d love to hear how it turned out — drop a comment below or tag me on social media!