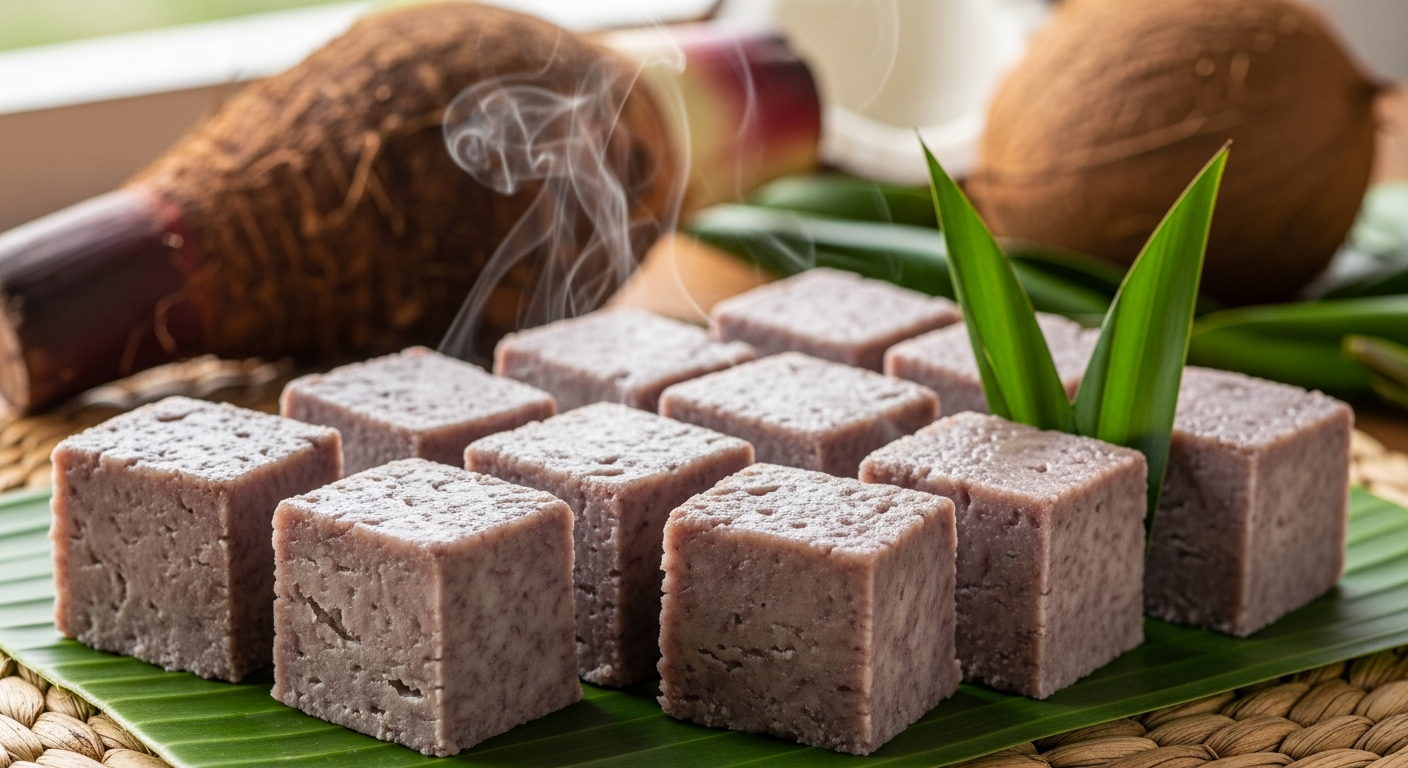
Kulolo is one of the oldest Hawaiian desserts — a dense, sticky, deeply earthy pudding made from taro and coconut that predates Western contact. Before sugar, before butter, before ovens, Native Hawaiians were making kulolo by wrapping grated taro and coconut cream in ti leaves and slow-cooking it in an imu (underground oven). The result is something that tastes like nothing else: starchy and sweet, smoky and rich, with a fudge-like texture that sticks to your teeth in the best possible way.
In a world full of borrowed and adapted dishes, kulolo is authentically, unapologetically Hawaiian. It’s one of the few desserts that connects directly to the pre-contact Hawaiian diet, where taro (kalo) was the most sacred and important food — the elder sibling of the Hawaiian people in their creation story. Eating kulolo isn’t just eating dessert. It’s tasting centuries of Hawaiian culture.
Understanding Taro’s Role in Hawaiian Culture
To understand kulolo, you need to understand taro. In Hawaiian cosmology, taro is not just a food — it’s family. The Kumulipo (Hawaiian creation chant) tells how the first taro plant grew from the body of Haloa, the stillborn first child of the gods Wakea and Ho’ohokukalani. The living second son, also named Haloa, became the ancestor of all Hawaiian people. This makes taro the older sibling of humanity — the plant that sustains and feeds its younger relatives.
Free: Hawaiian Cooking Starter Kit
Get 5 essential island recipes + a printable pantry checklist — everything you need to start cooking Hawaiian at home.
No spam, ever. Unsubscribe anytime.
This is why taro is treated with such reverence in Hawaiian culture, and why dishes like kulolo, poi, and luau (taro leaf dishes) hold a place at every significant Hawaiian gathering. Making kulolo is an act of connection to that history.
Ingredients
Kulolo is beautifully simple. The ingredient list is short, but the quality of your taro and coconut makes all the difference.
- 2 pounds taro root (kalo) — use fresh taro, peeled and finely grated. Look for the Hawaiian variety with purple-white flesh if you can find it. Chinese taro works too.
- 1 can (13.5 oz) full-fat coconut milk
- 1 cup coconut cream (the thick stuff from the top of the can, or buy it separately)
- 1 cup dark brown sugar — packed. Dark brown sugar gives the best color and depth of flavor. Some traditional recipes use coconut sugar.
- 1/2 teaspoon vanilla extract — not traditional, but many modern recipes include it
- Ti leaves — for lining the pan (optional but authentic). Banana leaves or parchment paper work as substitutes.
Traditional vs. Modern Method
Traditional kulolo is cooked in an imu — an underground pit oven lined with hot volcanic rocks and banana leaves. The kulolo is wrapped in ti leaves and buried in the imu for hours, where it slow-steams and absorbs a subtle smokiness from the earth and leaves. If you’ve ever had kulolo at a luau or from a Hawaiian family that cooks in an imu, you know that smoky, earthy depth is part of the magic.
The modern oven method can’t replicate that smokiness, but it produces excellent kulolo — dense, sweet, and sticky with the same essential taro-coconut flavor. The key is low heat and patience: baking at 350°F for about 2 hours gives you the right texture.
Step-by-Step: Oven-Baked Kulolo
Step 1: Prepare the Taro
Peel the taro root and grate it finely using a box grater or food processor fitted with the fine grating disc. Work quickly — taro oxidizes and turns brown when exposed to air, though this won’t affect the flavor or final color. Important: raw taro contains calcium oxalate crystals that can irritate your skin. Wear gloves while handling raw taro, or coat your hands in oil before grating.
Step 2: Mix Everything Together
In a large bowl, combine the grated taro, coconut milk, coconut cream, dark brown sugar, and vanilla extract. Stir thoroughly until the sugar is dissolved and everything is evenly mixed. The mixture will look like a thick, slightly grainy batter — that’s exactly right.
Step 3: Prepare the Pan
Preheat your oven to 350°F. If you have ti leaves, line a 9×13 baking pan with them, letting the leaves hang over the edges (you’ll fold them over the top later). If using parchment paper, line the pan with an overhang for easy removal. Lightly grease whatever you’re using with coconut oil.
Step 4: Bake Low and Slow
Pour the taro mixture into the prepared pan and spread it evenly — it should be about 1 to 1.5 inches thick. If using ti leaves, fold them over the top. Cover the pan tightly with aluminum foil. Bake for 1 hour covered, then remove the foil and bake for another 45 minutes to 1 hour uncovered. The kulolo is done when the top is set and slightly firm to the touch, and the edges are pulling away from the pan slightly. A toothpick won’t come out clean — kulolo is supposed to be sticky and dense.
Step 5: Cool Completely
This is the hardest part — you need to let the kulolo cool completely in the pan. As it cools, it sets and becomes dense and fudge-like. Trying to cut it warm results in a sticky mess. Once it’s room temperature (or even better, after a few hours in the fridge), turn it out onto a cutting board and slice into squares or rectangles.
What Good Kulolo Looks and Tastes Like
Good kulolo is dense — think fudge or mochi, not cake. It should be slightly sticky to the touch, with a deep purple-brown color. The flavor is uniquely taro: earthy, nutty, and starchy, balanced by the sweetness of brown sugar and the richness of coconut. It should taste like the earth in the best possible way, with a long, satisfying finish.
Bad kulolo is either too dry (overbaked) or too wet (underbaked). The texture should be between a firm pudding and a soft fudge. If you can pick up a piece and eat it with your hands without it falling apart, you nailed it.
Serving Kulolo
- Room temperature is the traditional way. Cut into squares and serve on a platter.
- Chilled from the fridge firms it up even more and intensifies the flavor. Many people prefer it this way.
- Warmed slightly in the microwave for 10 seconds makes it softer and more pudding-like.
- Wrapped in ti leaves for a luau presentation — this is how you’d see it at a traditional Hawaiian feast.
Kulolo keeps well in the fridge for up to a week and freezes beautifully for up to 3 months. Wrap individual pieces in plastic wrap for easy grab-and-go treats.
Tips for Perfect Kulolo
- Grate the taro finely. Coarse chunks won’t break down during baking and you’ll end up with a lumpy texture. The finer the grate, the smoother the kulolo.
- Use full-fat coconut milk. Light coconut milk doesn’t have enough fat to give kulolo its rich, creamy texture. Full-fat is essential.
- Don’t overbake. Kulolo should be sticky and dense, not dry and crumbly. It’s better to pull it slightly early than to overbake it.
- Wear gloves when handling raw taro. The calcium oxalate in raw taro causes an itchy, irritating sensation on bare skin. It’s completely harmless once cooked, but grating raw taro with bare hands is not a good time.
- Let it cool completely. Patience. The texture transforms as it cools from a soft, warm pudding into the dense, fudgy consistency that kulolo is known for.
A Dessert with Deep Roots
In a food landscape full of adapted, borrowed, and fusion dishes, kulolo stands apart as something genuinely ancient and Hawaiian. It connects the person eating it to centuries of Hawaiian tradition — to the cultivation of kalo in lo’i (taro paddies), to the imu cooking that fed whole communities, to the reverence for the land and its gifts that is central to Hawaiian identity.
You can make kulolo with a box grater and a regular oven, and it will taste wonderful. But as you eat it, know that you’re tasting something much older and much more meaningful than a simple dessert. You’re tasting Hawaii itself.