Before you read
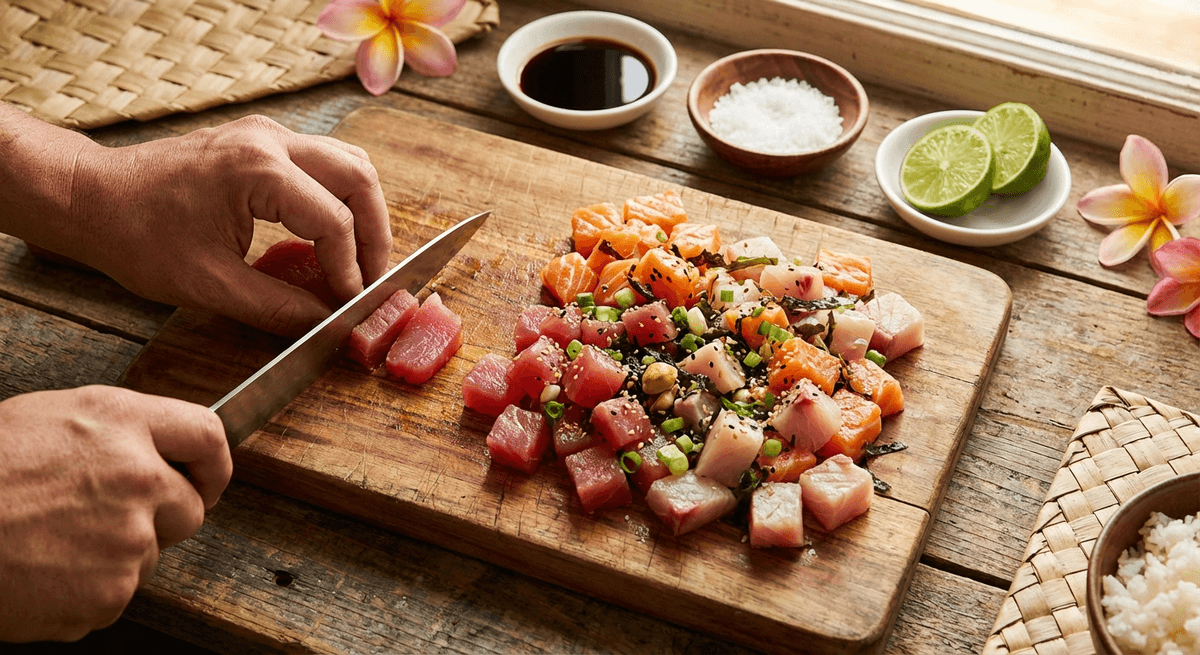
A clean cut changes the whole bowl.
Poke starts with fish, but texture is what people remember. CurtisJ's rule is to cut with intention: even pieces, clean edges, and just enough size to stay substantial once the seasoning hits.
You can have the freshest ahi on the island, but if you hack it into uneven chunks with a dull knife, your poke will taste like it came from the back of a gas station cooler. The cut is everything. It determines texture, how the fish absorbs marinade, and whether each bite melts on your tongue or fights back.
This guide teaches you the two essential cuts every home cook needs for Hawaiian-style poke and sashimi: the clean cube and the angled slice. Once you get these down, your ahi poke bowls and poke stacks will look and taste like they came from a poke shop on Ke’eaumoku Street.
Why the Cut Matters More Than You Think
A proper poke cube isn’t just about aesthetics. When you cut against the grain into uniform pieces, three things happen:
- Better texture. Cutting against the muscle fibers shortens them, so each piece is tender rather than chewy.
- Even marination. Uniform cubes absorb shoyu, sesame oil, and other seasonings at the same rate — no bland centers or over-salted edges.
- Clean presentation. Neat cubes hold their shape in a bowl and look intentional, not haphazard.
A ragged, sawing cut tears the delicate muscle fibers and creates a mealy texture. A single clean draw of the knife preserves the fish’s integrity.
Essential Tools
You don’t need a wall of Japanese knives, but you do need the right basics:
- A sharp, long-bladed knife. A yanagiba (sashimi knife) is ideal — its single-bevel edge makes razor-thin, clean cuts. A sharp 10-inch chef’s knife works fine too. The key is length: you want to draw through the fish in one stroke, not saw back and forth. See our fish knife guide for recommendations.
- A large cutting board. Plastic or high-density polyethylene is best for raw fish, it won’t absorb odors and sanitizes easily. Check our cutting board guide for details.
- A damp towel. Place it under your cutting board to prevent slipping. Safety first.
- Paper towels. Pat the fish dry before cutting — wet fish slides under the blade and leads to uneven cuts.
Choosing and Prepping Your Fish
For poke, you want sashimi-grade (or “sushi-grade”) fish. This isn’t a regulated USDA term, it means the fishmonger is vouching that it’s fresh enough to eat raw. Here’s what to look for:
- Color: Ahi should be deep ruby-red to magenta. Avoid brown or dull-looking tuna.
- Smell: Fresh fish smells like the ocean — clean, briny, slightly sweet. If it smells “fishy,” walk away.
- Texture: The flesh should be firm and spring back when pressed. Soft, mushy spots mean it’s past its prime.
- Source: Ask your fishmonger when it came in. Buy on delivery day if possible.
If you’re working with a whole block (saku block), you may need to break it down from a larger piece first. Most home cooks will be starting with a pre-cut saku block, which is perfect.
Before cutting: Remove the fish from the fridge and pat it completely dry with paper towels. Cold fish cuts cleaner than room-temperature fish, so don’t let it sit out too long, 5 minutes max.
The Classic Poke Cube Cut
This is the cut you’ll use for traditional Hawaiian poke. The goal is 3/4-inch cubes — big enough to have presence, small enough to eat in one bite.
Step 1: Identify the Grain
Look at your saku block. You’ll see faint lines running in one direction, those are the muscle fibers (the grain). You want to cut against (perpendicular to) the grain, not with it.
Step 2: Slice Into Planks
Place the block with the grain running left to right. Starting from one end, cut 3/4-inch thick slices going against the grain. Use a single smooth draw of the knife — start at the heel (back) of the blade and pull toward you through the tip. Never saw back and forth. Let the knife’s sharpness do the work.
Step 3: Cut Into Strips
Lay each plank flat and cut it into 3/4-inch strips, using the same single-draw technique.
Step 4: Cube the Strips
Turn the strips 90 degrees and cut across them at 3/4-inch intervals to create cubes. Done. You should have uniform, clean-edged cubes ready for your ahi poke bowl.
The Sashimi Slice
This angled slice is what you’ll use for poke stacks, sashimi platters, and ahi katsu preparation.
Step 1: Angle Your Knife
Hold your knife at about a 30-45 degree angle to the cutting board, with the blade tilted to the right (for right-handers). This creates wider slices from the same block of fish.
Step 2: Draw Through in One Motion
Starting from the heel of the knife, draw the blade toward you in a single fluid stroke. The slice should be about 1/4-inch thick — thin enough to be translucent at the edges, thick enough to have substance.
Step 3: Lift and Lay
Use the flat of the blade to gently lift each slice and lay it on your serving plate or stack it for assembly. Handle the fish as little as possible — your hands warm it up and affect texture.
Common Mistakes to Avoid
- Sawing back and forth. This tears the fibers and creates ragged edges. One smooth draw, every time.
- Using a dull knife. A dull blade crushes rather than cuts. If you have to press hard, your knife needs sharpening.
- Cutting with the grain. This leaves you with chewy, stringy pieces. Always go against the grain.
- Letting the fish warm up. Warm fish is soft and hard to cut cleanly. Work quickly and return unused portions to the fridge.
- Touching the fish too much. Handle it with the flat of your blade and clean fingertips. Over-handling raises the temperature and breaks down the texture.
- Uneven cuts. Take your time getting consistent 3/4-inch measurements. Your poke will look and taste noticeably better with uniform pieces.
Practice Tips
- Practice on cheaper fish. Salmon is more forgiving than ahi and costs less. Get comfortable with the technique before splurging on sashimi-grade tuna.
- Sharpen before every session. A few passes on a honing steel before you start makes a dramatic difference.
- Keep a bowl of ice water nearby. If your hands get warm, dip your fingertips briefly to cool them down before handling the fish again.
- Cut only what you need. Poke is best eaten within a few hours of cutting. Don’t cube more fish than you’ll serve — keep the rest as a block in the fridge for up to 24 hours.
Now Put It to Work
With these techniques in your back pocket, you’re ready to make poke that looks and tastes like it belongs in a glass case at Ono Seafood. Try the classic cube cut with our Ahi Poke Bowl, or go upscale with the sashimi slice for Gourmet Poke Bowls. And once you’re comfortable, use both cuts in our Ahi Tuna Poke Stacks, they’re a showstopper.
Respect the fish, keep your knife sharp, and let one clean stroke do the talking.


